默认情况下,启动容器时, docker把宿主系统特定系统文件复制到宿主机中保存容器配置的目录(/var/lib/docker/containers),然后使用绑定挂载(mount --bind)把副本链接到容器里。在启动的容器里执行mount
root@c0bfa0fff107:/# mount |grep etc
/dev/disk/by-uuid/780b6c34-5a41-4be3-a954-171ce2f4c855 on /etc/resolv.conf type ext4 (rw,relatime,errors=remount-ro,data=ordered)
/dev/disk/by-uuid/780b6c34-5a41-4be3-a954-171ce2f4c855 on /etc/hostname type ext4 (rw,relatime,errors=remount-ro,data=ordered)
/dev/disk/by-uuid/780b6c34-5a41-4be3-a954-171ce2f4c855 on /etc/hosts type ext4 (rw,relatime,errors=remount-ro,data=ordered)
进入容器方式
docker exec
or nsenter
就算docker daemon没有响应,无法使
用docker exec,使用nsenter进入容器。
大多数linux都提供了包含nsenter的 util-linux包。
安装nsenter
$docker run --rm -v /usr/local/bin:/target jpetazzo/nsenter
镜像制作时需要考虑镜像的配置可以通过配置文件,命令行参数和环境变量的组合配置来完成。这些配置应该从image内容中解耦,以此来保持容器化应用程序的便携性。
Verify mounts becomes visible in container using "findmnt -o TARGET"
docker save and docker load will preserve image metadata (CMD, ENTRYPOINT, etc) and all layers.
docker export and docker import don't preserve metadata. This is by design and it's not being changed.
docker import will be extended with a --change option to allow CMD, ENTRYPOINT, ENV and many other options to be set. Please take a look at #7239 for the plan concerning this, especially #7239 (comment)
Squashing layers will also be implemented, so that will be another way to address the problem of flattening images while keeping metadata.
This issue is invalid. I'll close it now.
root@c0bfa0fff107:/# mount |grep etc
/dev/disk/by-uuid/780b6c34-5a41-4be3-a954-171ce2f4c855 on /etc/resolv.conf type ext4 (rw,relatime,errors=remount-ro,data=ordered)
/dev/disk/by-uuid/780b6c34-5a41-4be3-a954-171ce2f4c855 on /etc/hostname type ext4 (rw,relatime,errors=remount-ro,data=ordered)
/dev/disk/by-uuid/780b6c34-5a41-4be3-a954-171ce2f4c855 on /etc/hosts type ext4 (rw,relatime,errors=remount-ro,data=ordered)
进入容器方式
docker execor nsenter
就算docker daemon没有响应,无法使
用docker exec,使用nsenter进入容器。
大多数linux都提供了包含nsenter的 util-linux包。
安装nsenter
$docker run --rm -v /usr/local/bin:/target jpetazzo/nsenter
镜像制作时需要考虑镜像的配置可以通过配置文件,命令行参数和环境变量的组合配置来完成。这些配置应该从image内容中解耦,以此来保持容器化应用程序的便携性。
Verify mounts becomes visible in container using "findmnt -o TARGET"
docker save and docker load will preserve image metadata (CMD, ENTRYPOINT, etc) and all layers.docker export and docker import don't preserve metadata. This is by design and it's not being changed.docker import will be extended with a --change option to allow CMD, ENTRYPOINT, ENV and many other options to be set. Please take a look at #7239 for the plan concerning this, especially #7239 (comment)Basically the official party line from Solomon Hykes and docker is that docker containers should be as close to single processes micro servers as possible. There may be many such servers on a single 'real' server. If a processes fails you should just launch a new docker container rather than try to setup initialization etc inside the containers. So if you are looking for the canonical best practices the answer is yeah no basic linux services. It also makes sense when you think in terms of many docker containers running on a single node, you really want them all to run their own versions of these services
Default Networks
When you install Docker, it creates three networks automatically. You can list these networks using thedocker network ls command:
sudo iptables -nL
$ docker network ls
$docker network inspect bridge
When you install Docker, it creates three networks automatically. You can list these networks using the
docker network ls command:sudo iptables -nL$ docker network ls
sudo apt-get install bridge-utils
brctl show
Docker does not support automatic service discovery on the default bridge network. If you want to communicate with container names in this default bridge network, you must connect the containers via the legacy docker run --link option.
docker run --link option.
The default docker0 bridge network supports the use of port mapping and docker run --link to allow communications between containers in the docker0network. These techniques are cumbersome to set up and prone to error. While they are still available to you as techniques, it is better to avoid them and define your own bridge networks instead
docker0 bridge network supports the use of port mapping and docker run --link to allow communications between containers in the docker0network. These techniques are cumbersome to set up and prone to error. While they are still available to you as techniques, it is better to avoid them and define your own bridge networks instead
Within a user-defined bridge network, linking is not supported. You can expose and publish container ports on containers in this network. This is useful if you want make a portion of the bridge network available to an outside network.
bridge network available to an outside network.
docker behind proxy
/etc/default/docker to add http_proxysudo restart dockertail -f /var/log/upstart/docker.logcgroup
$sudo dpkg --get-selections | grep cgroup
cgroup-lite install
$dpkg-query -L cgroup-lite
/etc/init/cgroup-lite.conf
/bin/cgroups-mount
/bin/cgroups-umount
/usr/bin/cgroups-mount
/usr/bin/cgroups-umount
restart a container
1: docker ps -a |grep "<container-name>"
2:docker run <image-id>
2:docker run <image-id>
2: docker start <container-id>
3: docker attach <container-id>
2:sudo docker exec -i -t <container-id> bash
The build’s context
The build’s context is the files at a specified location
PATH or URL. The PATH is a directory on your local filesystem. TheURL is a the location of a Git repository.
The build is run by the Docker daemon, not by the CLI. The first thing a build process does is send the entire context (recursively) to the daemon. In most cases, it’s best to start with an empty directory as context and keep your Dockerfile in that directory. Add only the files needed for building the Dockerfile
or copy host file to volume data inside a container
docker cp file $ID:/var/jenkins
docker vs VM

extract volume data inside a container to host
docker cp $ID:/var/jenkins_home .or copy host file to volume data inside a container
docker cp file $ID:/var/jenkins
docker vs VM

 |
| VM STACK |
 |
| CONTAINER STACK |
参考
https://www.openstack.org/summit/tokyo-2015/videos/presentation/beginners-guide-to-containers-technology-and-how-it-actually-works
From ssh://wufei@review.hpcloud.net:29418/hp/horizon-selenium.git
f43051737e948ea6278c4c53edaceb1f14ecc2cb refs/changes/05/92305/1
fb99aee1551ad6da69d21f3999969bce63b6a7c9 refs/changes/05/92305/2
0d380f82530903a42f59acf6a1ba73df5a0853e6 refs/changes/05/92305/3
c0892064a341c70481fa7dc1dc11910e94e1acc3 refs/changes/05/92305/4
3b445d0a02bc8439fdf96fd4e218d5a812eb317a refs/changes/05/92305/5
b65f5050a44a851689be0793712621303dccf60f refs/changes/05/92305/6
c8c78f49ffac0ee8ec91a61ca3ca51493f7e5aa3 refs/changes/05/92305/7
b6d5dd7102401b4bd53d6643ef49748d3300abb1 refs/changes/05/92305/8
$ git checkout b6d5dd7102401b4bd53d6643ef49748d3300abb1 <file-name>
Gerrit checkout a file from a specified patch set
$git ls-remote | grep 92305(patch-id)From ssh://wufei@review.hpcloud.net:29418/hp/horizon-selenium.git
f43051737e948ea6278c4c53edaceb1f14ecc2cb refs/changes/05/92305/1
fb99aee1551ad6da69d21f3999969bce63b6a7c9 refs/changes/05/92305/2
0d380f82530903a42f59acf6a1ba73df5a0853e6 refs/changes/05/92305/3
c0892064a341c70481fa7dc1dc11910e94e1acc3 refs/changes/05/92305/4
3b445d0a02bc8439fdf96fd4e218d5a812eb317a refs/changes/05/92305/5
b65f5050a44a851689be0793712621303dccf60f refs/changes/05/92305/6
c8c78f49ffac0ee8ec91a61ca3ca51493f7e5aa3 refs/changes/05/92305/7
b6d5dd7102401b4bd53d6643ef49748d3300abb1 refs/changes/05/92305/8
$ git checkout b6d5dd7102401b4bd53d6643ef49748d3300abb1 <file-name>
docker-machine -D create -d virtualbox mh-keystore
docker $(docker-machine config mh-keystore) run -d \ -p "8500:8500" \ -h "consul" \ progrium/consul -server -bootstrap
Set your local environment to the
mh-keystoremachine$ docker-machine env mh-keystore export DOCKER_TLS_VERIFY="1" export DOCKER_HOST="tcp://192.168.99.100:2376" export DOCKER_CERT_PATH="/home/whg/.docker/machine/machines/mh-keystore" export DOCKER_MACHINE_NAME="mh-keystore" # Run this command to configure your shell: # eval "$(docker-machine env mh-keystore)"
Create a Swarm master
$docker-machine -D create \ -d virtualbox \ --swarm --swarm-master \ --swarm-discovery="consul://$(docker-machine ip mh-keystore):8500" \ --engine-opt="cluster-store=consul://$(docker-machine ip mh-keystore):8500" \ --engine-opt="cluster-advertise=eth1:2376" \ mhs-demo0 Create another host and add it to the Swarm cluster. $docker-machine -D create -d virtualbox \ --swarm \ --swarm-discovery="consul://$(docker-machine ip mh-keystore):8500" \ --engine-opt="cluster-store=consul://$(docker-machine ip mh-keystore):8500" \ --engine-opt="cluster-advertise=eth1:2376" \ mhs-demo1$docker-machine ls
check docker bridge is with wich linux bridge
$brctl show bridge name bridge id STP enabled interfaces docker0 8000.0242a46ea17a no whg@devstack:~$ docker network ls NETWORK ID NAME DRIVER 1868956e675b bridge bridge $ docker network inspect bridge | grep bridge.name "com.docker.network.bridge.name": "docker0"
From a network architecture point of view, all containers on a given Docker host are sitting on bridge interfaces. This means that they are just like physical machines connected through a common Ethernet switch; no more, no less.
docker diff <container-id>
docker history <image-id>
docker diff <container-id>
docker history <image-id>
Pluggable Backends
Execution Drivers
$ docker info | grep "Execution Driver"
Execution Driver: native-0.2
If you are considering using Docker containers in production, you should make certain that the systems you are running have AppArmor or SELinux enabled and running. For the most part, both systems are reasonably equivalent. But in the Docker context, one notable limitation of SELinux is that it only works fully on systems that support filesystem metadata, which means that it won’t work for you on BTRFS-backed Docker daemons, for example. Only the devicemapper backend currently fully supports SELinux. Unfortunately, that backend is also not currently very stable for production. The OverlayFS backend is going to support this shortly. AppArmor, on the other hand, does not use filesystem metadata and so works on all of the Docker backends. Which one you use is going to be somewhat distribution-centric, so you may be forced to choose a filesystem backend based on which distribution you run.
 If we have a client somewhere on the network that wants to talk to the nginx server running on TCP port 80 inside Container 1, the request will come into the
When Docker creates a container, it creates two virtual interfaces, one of which sits on the server-side and is attached to the
It would be entirely possible to run a container without the whole networking configuration that Docker puts in place for you. And the
Docker containers don’t have a separate kernel, as a VM does. Commands run from a Docker container appear in the process table on the host and, in most ways, look very much like any other process running on the system
To display the processes that a container is running, use the docker top
$docker top container-id
If you are considering using Docker containers in production, you should make certain that the systems you are running have AppArmor or SELinux enabled and running. For the most part, both systems are reasonably equivalent. But in the Docker context, one notable limitation of SELinux is that it only works fully on systems that support filesystem metadata, which means that it won’t work for you on BTRFS-backed Docker daemons, for example. Only the devicemapper backend currently fully supports SELinux. Unfortunately, that backend is also not currently very stable for production. The OverlayFS backend is going to support this shortly. AppArmor, on the other hand, does not use filesystem metadata and so works on all of the Docker backends. Which one you use is going to be somewhat distribution-centric, so you may be forced to choose a filesystem backend based on which distribution you run.
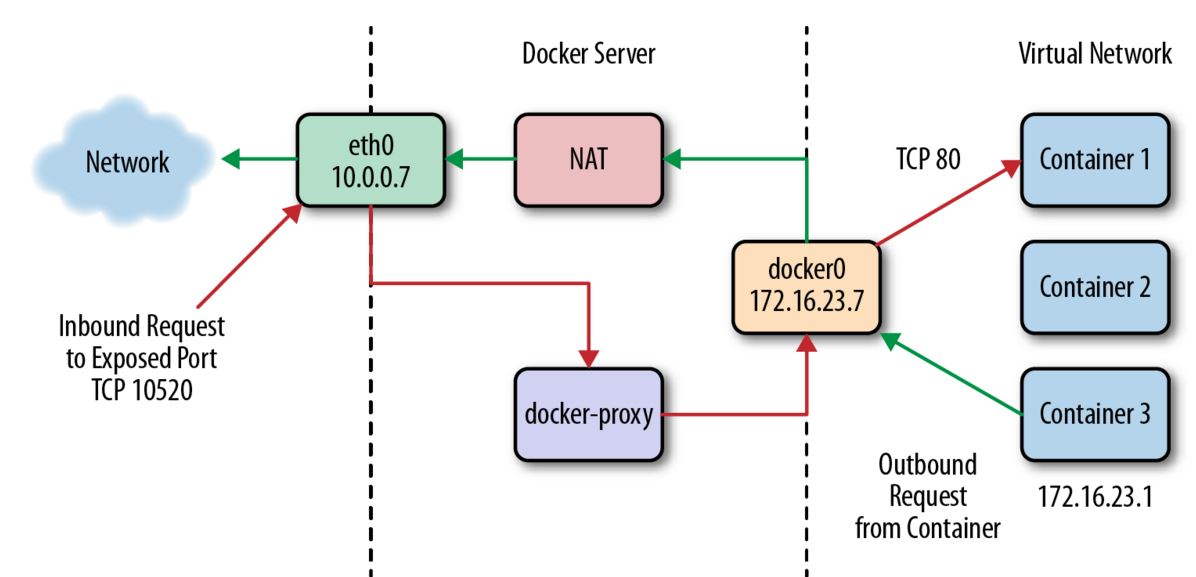
eth0 interface on the Docker server. Because Docker knows this is a public port, it has spun up an instance of docker-proxy to listen on port 10520. So our request is passed to the docker-proxy process, which then makes the request to the correct container address and port on the private network. Return traffic from the request flows through the same routeWhen Docker creates a container, it creates two virtual interfaces, one of which sits on the server-side and is attached to the
docker0 bridge, and one that is exposed into the container’s namespaceIt would be entirely possible to run a container without the whole networking configuration that Docker puts in place for you. And the
docker-proxy can be somewhat throughput limiting for very high-volume data services. So what does it look like if we turn it off? Docker lets you do this on a per-container basis with the --net=host command-line switch. There are times, like when you want to run high throughput applications, where you might want to do thisDocker containers don’t have a separate kernel, as a VM does. Commands run from a Docker container appear in the process table on the host and, in most ways, look very much like any other process running on the system
To display the processes that a container is running, use the docker top
$docker top container-id
flannel
Running etcd under Docker
Running etcd in standalone mode
export HostIP="192.168.12.50"docker run -d -v /usr/share/ca-certificates/:/etc/ssl/certs -p 4001:4001 -p 2380:2380 -p 2379:2379 \
--name etcd quay.io/coreos/etcd \
-name etcd0 \
-advertise-client-urls http://${HostIP}:2379,http://${HostIP}:4001 \
-listen-client-urls http://0.0.0.0:2379,http://0.0.0.0:4001 \
-initial-advertise-peer-urls http://${HostIP}:2380 \
-listen-peer-urls http://0.0.0.0:2380 \
-initial-cluster-token etcd-cluster-1 \
-initial-cluster etcd0=http://${HostIP}:2380 \
-initial-cluster-state newdocker exec etcd /etcdctl member listdocker exec etcd /etcdctl set /coreos.com/network/config '{ "Network": "10.1.0.0/16" }'curl -L -X PUT http://127.0.0.1:2379/v2/keys/message -d value="Hello"
./etcdctl --endpoint http://10.0.0.10:2379 member list
etcdctl rm /message
etcdctl mkdir /foo-service
etcdctl set /foo-service/container1 localhost:1111
curl -L -X PUT http://127.0.0.1:2379/v2/keys/foo-service/container1 -d value="localhost:1111"
etcdctl ls /foo-service
$ cd
flannel
$ docker run -v `pwd`:/opt/flannel
-i -t google/golang /bin/bash -c "cd /opt/flannel
&& ./build"
$ curl -L
http://127.0.0.1:4001/v2/keys/coreos.com/network/config
-XPUT -d value='{
"Network": "10.0.0.0/8",
"SubnetLen": 20,
"SubnetMin": "10.10.0.0",
"SubnetMax": "10.99.0.0",
"Backend": {"Type": "udp",
"Port": 7890}}
'
source /run/flannel/subnet.env
$ sudo ifconfig docker0 ${FLANNEL_SUBNET}
$ sudo docker -d --bip=${FLANNEL_SUBNET}
--mtu=${FLANNEL_MTU} &
Setup another flannel agent./flanneld -etcd-endpoints http://10.0.0.10:2379
Debug a service in container

This will install nsenter in /usr/local/bin and you will be able to use it immediately. nsenter might also be available in your distro (in the util-linux package).

docker run -v /usr/local/bin:/target jpetazzo/nsenter


First, figure out the PID of the container you want to enter:

PID=$(docker inspect --format {{.State.Pid}} <container_name_or_ID>)


Then enter the container:

nsenter --target $PID --mount --uts --ipc --net --pid


You will get a shell inside the container
